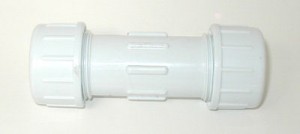
A compression coupling or tee is a special fitting designed for joining existing metal and PVC pipes or tubes. They are sometimes sold as “pipe repair couplings”. They are primarily used for underground connections. Other types of compression fittings, such as threaded adapters, are also available for situations where something other than a coupling or tee is needed. Compression couplings are primarily used for pipe repairs, compression tees are used to tap a new pipe/tube into an existing one. A compression fitting may be constructed of PVC or metal. PVC should only be used for connections that will be hidden from sunlight, like underground or in a box.

A compression fitting works by using a rubber gasket. This gasket is compressed against the existing pipe when you tighten a nut on the end of the fitting. This makes a leak-free seal without the need to thread, glue, or solder the pipe connection. Use metal body compression fittings above ground level, PVC may be used below ground but must be installed below the frost level. Compression fittings may leak if used on heavily corroded, rusty, or pitted pipe. For this reason some professionals do not recommend that they be used on older steel or galvanized steel pipe. The pipe or tubes attached to a compression fitting must be firmly held in place, if not buried they should be strapped down tightly. If the pipes or tubes can shift or move the compression fitting will not hold!
Note: some drip irrigation fittings are also called “compression” fittings. They are not the same thing as these tees and ells shown here! Also “compression fittings” are sometimes used for copper, polyethylene and PEX tubes, they are similar to these, but also are not the same thing. These compression fittings are only for rigid pipes, like PVC or metal.
To use a compression tee to tap into an existing pipe:

- First, the pipe you want to install the compression tee or coupling on must be firmly anchored in place. It is particularly important to make sure the pipe will not be able to slide back and forth in the lengthwise direction. If the pipe can slide, it will blow out of the end of the compression fitting! The rubber gasket will NOT hold the pipe in place. This often happens if the pipe has an ell (change of direction) within a few feet of where you install the compression fitting. If there is an ell in the pipe near the compression fitting, the ell must be “blocked” in place. For underground pipes a brick behind the ell wedged between the ell and undisturbed soil can be used as a block to keep the ell from moving. Do not use wood as a brace underground, the wood will rot out. You can also use concrete to hold the pipe in place. The official term used for the brick or concrete that holds the pipe in place is a “thrust block”. If the pipe is above ground, it needs to be firmly strapped in place so it will not move.
- Make sure you buy the correct size compression tee! It will leak if you use the wrong size. The size will depend on both the size of the pipe you are installing it on AND the material the pipe is made out of. Read the sizes carefully! For example: the same compression fitting size fits 1/2″ PVC, 1/2″ iron-steel pipe, and 3/4″ copper tube! Often this compression fitting is simply labeled as “1/2 I, 3/4 C” which can seem a bit cryptic to most people. If in doubt ask the salesperson to help you select the proper size and hope the salesperson knows what they are talking about.
- Once you have the tee, shut off the water in the pipe you are going to tap into. Now cut a small section out of the pipe you wish to tap into. The section you cut out will need to be about half the length of the compression tee. Remove any burrs from the cut end of the pipe. Clean the pipe surface to remove any dirt, rust, scale, or oil from the pipe. A wire brush should be used to clean metal pipe.
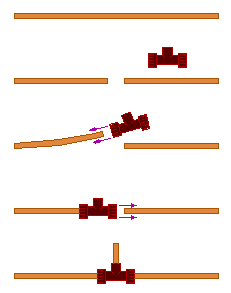
- Each end of the compression tee has a nut (or ring) that is used to tighten it onto the pipe. Between the compression tee body and the nut is a rubber gasket. Slide the compression tee onto one end of the pipe. Note: the drawing below shows the compression tee sliding onto the pipe, however, you may find that you need to remove the nut and gasket and put them onto the pipe ends first and then reassemble the whole thing on the pipe. The gaskets fit very snug. You may need to wiggle it around a bit to work them into place, or you may need to tap the fitting with a rubber mallet to get them into place. Do not use soap to lubricate them! If you must use a lubricant, use original KY Jelly (not the warming type) it is an excellent water-based lubricant, plumbers use it all the time.
- Now slide the compression tee so it is centered between the two pipe sections.
- Tighten the rings down to seal the rubber gasket onto the pipe. That’s all, you’re done! Install the new pipe going to your irrigation system into the side outlet of the tee.